

Table of Contents
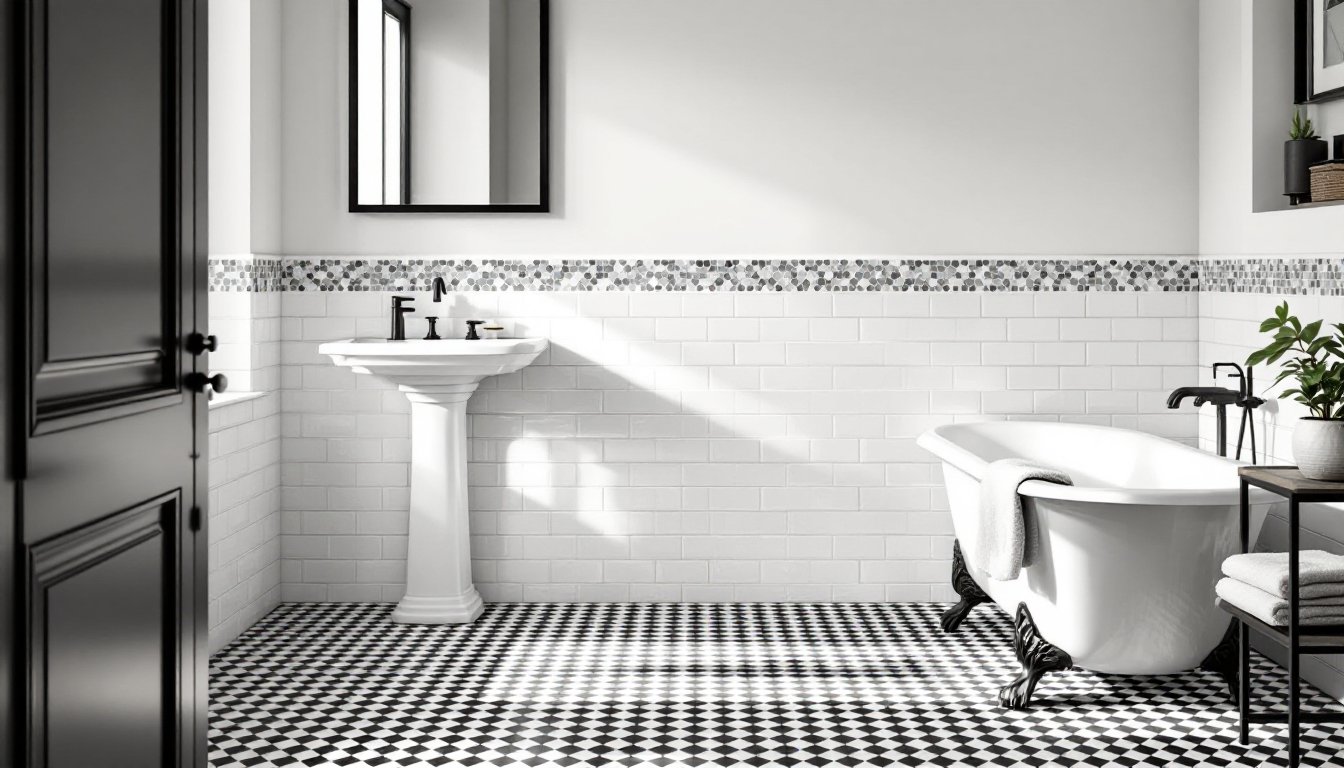
ToggleBlack and white bathroom tiles remain one of the most versatile choices for renovation projects, combining classic appeal with modern flexibility. Whether working with a cramped powder room or a generous master bath, this high-contrast palette creates visual interest without the risk of dated color trends. The combination works across every design style, from vintage subway tile to contemporary geometric patterns, and offers practical benefits beyond aesthetics. Properly installed black and white tile delivers decades of service, resists moisture damage better than many alternatives, and provides a neutral backdrop that adapts as fixtures and finishes change over time.
Key Takeaways
- Black and white tile bathrooms offer timeless design appeal that transcends trendy color cycles, making them a smart resale investment that reads both classic and current to homebuyers.
- High-contrast black and white tile patterns mask wear and reduce cleaning frequency while white tiles reflect light to make small bathrooms feel larger and less cramped.
- Porcelain tile is the most durable bathroom material with water absorption below 0.5%, while ceramic works for walls and low-traffic areas at lower cost.
- Proper installation requires surface prep with cement backer board in wet areas, dry-layout planning to avoid slivers, and 24–48 hours thinset cure time before grouting.
- Black grout on white tiles hides staining and creates sharp definition, while gray grout offers a balanced compromise in mixed black and white patterns.
- Pairing black and white tile with warm-toned lighting (2700–3000K), natural wood cabinetry, and layered lighting prevents the space from feeling harsh and overly stark.
Why Black and White Tile Bathrooms Never Go Out of Style
The enduring popularity of black and white bathroom tile comes down to pure design fundamentals. High contrast creates depth and definition in rooms where square footage is limited. White tiles reflect light and make small bathrooms feel larger, while black grout lines or accent tiles add dimension without overwhelming the space.
This color scheme also masks the inevitable wear that shows up in busy bathrooms. Light grout in all-white installations telegraphs every speck of dirt. Black and white patterns, especially checkerboard or geometric layouts, camouflage minor staining and reduce the frequency of deep cleaning.
From a resale perspective, black and white reads as both classic and current. Homebuyers don’t categorize it with the trendy subway tiles of 2015 or the travertine of 2005, it transcends specific eras. Many interior design experts recommend this palette precisely because it doesn’t lock a home into a narrow aesthetic window.
Material availability is another practical advantage. Manufacturers stock black and white tiles in every format: ceramic, porcelain, natural stone, cement, and glass. Pricing spans budget to luxury, and discontinued styles are easily matched or replaced without sourcing specialty colors.
Popular Black and White Tile Patterns and Layouts
Choosing the right pattern for black and white bathroom tiles depends on room size, lighting, and the level of visual interest desired. Some layouts read traditional, others contemporary, understanding the effect helps match the design to the home’s overall style.
Classic Checkerboard and Grid Designs
Checkerboard remains the quintessential black and white tile bathroom layout. Standard installation uses 12″×12″ or smaller tiles in alternating colors. In tight quarters, drop to 6″×6″ or 4″×4″ formats to maintain proportion, oversized checkerboard in a small bathroom can feel off-balance.
For a subtler grid effect, use white field tiles with black accent stripes or borders. A common approach: run a single course of black tile at chair-rail height (typically 32″–36″ from the floor) to break up an all-white surround. This works well in vintage or farmhouse-style baths.
Subway tile in a stacked or offset (brick-bond) pattern offers flexibility. Go with white subway tiles and black grout for definition, or reverse it with black tiles and white grout for drama. Standard subway dimensions are 3″×6″, but 2″×4″ and 4″×8″ versions are widely available. Use a miter saw with a diamond blade or a wet saw for clean cuts around outlets and fixtures.
Modern Geometric and Hexagon Patterns
Hexagon tile, both large-format and penny-round mosaics, brings a contemporary edge to black and white bathrooms. These tiles typically come on mesh-backed sheets (usually 12″×12″ sheets) for easier installation. Mixing black and white hexagons in random or planned patterns adds movement without requiring complex cutting.
Geometric patterns like chevron, herringbone, and Moroccan-inspired shapes create visual flow. Herringbone, installed at a 45-degree angle, elongates narrow bathrooms and draws the eye through the space. This layout requires more material (plan for 15–20% waste due to angled cuts) and takes longer to install than straight grid patterns.
For accent walls or shower niches, consider 3D or relief tiles in black and white. These add texture and depth, particularly effective in bathrooms with ample natural light. Pair them with flat field tiles to avoid a busy look.
Choosing the Right Tile Materials and Finishes
Material selection affects durability, slip resistance, and maintenance as much as appearance. Not all black and white tiles perform equally in wet environments.
Porcelain is the workhorse for bathroom floors and walls. It’s denser and less porous than ceramic, with water absorption rates below 0.5%. Look for tiles rated for wet areas, PEI rating of 3 or higher for floors. Porcelain handles freeze-thaw cycles if the bathroom is in an unheated space, and it resists chipping better than ceramic.
Ceramic tile costs less and works fine for walls and low-traffic floors. It’s easier to cut with a standard snap cutter, which speeds up installation for DIYers. Just verify it’s rated for bathrooms (check the absorption rating).
Natural stone, marble, granite, slate, requires more upkeep. Marble offers a luxe look but needs sealing every 6–12 months to prevent staining. Honed (matte) finishes provide better slip resistance than polished stone, critical for shower floors. Black granite hides water spots: white marble shows every drip.
Cement or encaustic tiles deliver pattern and color in a single tile, often with intricate black-and-white motifs. They’re porous and must be sealed before grouting and resealed annually. These tiles suit vintage or eclectic styles but aren’t ideal for DIY first-timers due to the sealing requirements.
Finish matters for safety and cleaning. Matte and textured finishes reduce slip risk on floors. Glossy tiles brighten walls but show water spots and soap scum. In small bathrooms, many designers favor mixing finishes, glossy wall tiles for light reflection, matte floor tiles for grip.
Step-by-Step Guide to Installing Black and White Bathroom Tile
Tile installation isn’t overly complex, but it demands precision and patience. Skipping prep or rushing the layout leads to lippage, uneven grout lines, and premature failures.
Materials and Tools:
- Black and white tiles (order 10–15% extra for cuts and breakage)
- Thinset mortar (modified for walls, unmodified for floors with membranes)
- Grout (sanded for joints wider than 1/8″, unsanded for tight joints)
- Tile spacers (1/16″, 1/8″, or 3/16″ depending on design)
- Notched trowel (size depends on tile size: 1/4″×1/4″ square-notch for most wall tiles, 1/2″×1/2″ for large floor tiles)
- Wet saw or snap cutter
- Grout float, sponges, buckets
- Level, straightedge, chalk line
- Safety gear: goggles, dust mask, knee pads, gloves
Step 1: Prep the Surface
Remove old tile, wallpaper, or peeling paint. Walls must be flat, clean, and dry. Install cement backer board (1/2″ thick) over studs in wet areas like showers, drywall isn’t adequate even if water-resistant. Fasten backer board with corrosion-resistant screws every 8″ and tape seams with fiberglass mesh tape and thinset.
For floors, ensure the subfloor is rigid. Tile cracks over flexing surfaces. Minimum subfloor for ceramic or porcelain: 5/8″ plywood over 16″ on-center joists, or double layers of 1/2″ plywood. Add an uncoupling membrane (like Schluter-DITRA) to isolate tile from minor substrate movement.
Step 2: Plan the Layout
Dry-lay tiles before mixing any mortar. For floors, snap chalk lines to find the room’s center and work outward, ensuring cut tiles at walls are reasonably symmetrical. Avoid ending with slivers narrower than half a tile.
For walls, start with a level batten board, a straight 1×2 screwed horizontally one tile-height above the floor or tub. This prevents tiles from slipping while thinset cures. Dry-fit the pattern to confirm alignment and minimize cuts around fixtures.
Step 3: Apply Thinset and Set Tiles
Mix thinset to a peanut-butter consistency (follow manufacturer’s water ratio). Spread with the notched trowel at a 45-degree angle, covering about 3–4 square feet at a time. Press tiles with a slight twist, using spacers for consistent joints. Check level frequently, use a straightedge across multiple tiles to catch high or low spots before thinset sets (typically 20–30 minutes of working time).
Cut tiles as needed with a wet saw for clean edges, especially around outlets, corners, and plumbing penetrations. Nippers work for small notches. Always wear safety goggles, tile fragments can fly.
Step 4: Grout and Seal
Wait 24–48 hours for thinset to cure fully. Remove spacers, then mix grout. Work it into joints with a grout float held at a 45-degree angle, pressing firmly. Wipe diagonally with a damp sponge, rinsing often to avoid haze.
After grout cures (check product instructions, usually 48–72 hours), apply a penetrating grout sealer if using sanded or cementitious grout. This step is non-negotiable in showers and on floors, it blocks moisture and staining. Reapply sealer annually in high-use bathrooms.
Styling Tips to Complement Your Black and White Tile
Black and white tiles provide a strong foundation, but surrounding finishes either elevate the design or muddle it.
Grout Color Strategy:
Black grout on white tiles creates sharp definition and hides staining. White grout on black tiles softens the look but requires more frequent cleaning. Gray grout splits the difference and works well in mixed black-and-white patterns.
Fixture Finishes:
Matte black faucets, showerheads, and cabinet hardware reinforce a modern aesthetic. Polished chrome or brushed nickel suits traditional styles. Avoid mixing more than two metal finishes in a single bathroom, it reads as indecisive rather than eclectic.
Cabinetry and Millwork:
White vanities and trim keep the space light and airy. Black vanities add drama but can shrink a small bathroom visually. Natural wood tones (walnut, oak) warm up the starkness of black and white tile without competing for attention.
Lighting and Accessories:
In bathrooms with limited natural light, layer ambient (overhead or recessed) and task (vanity sconces) lighting. Warm white bulbs (2700–3000K) soften the high contrast. Add texture with woven baskets, linen towels, or greenery, these organic elements balance the hard surfaces.
Many renovation projects feature black and white tiles paired with bold accent walls or colorful textiles. This approach lets homeowners refresh the look seasonally without retiling. A black-and-white tile bathroom isn’t a blank slate, it’s a versatile canvas that adapts as tastes and trends shift.