

Table of Contents
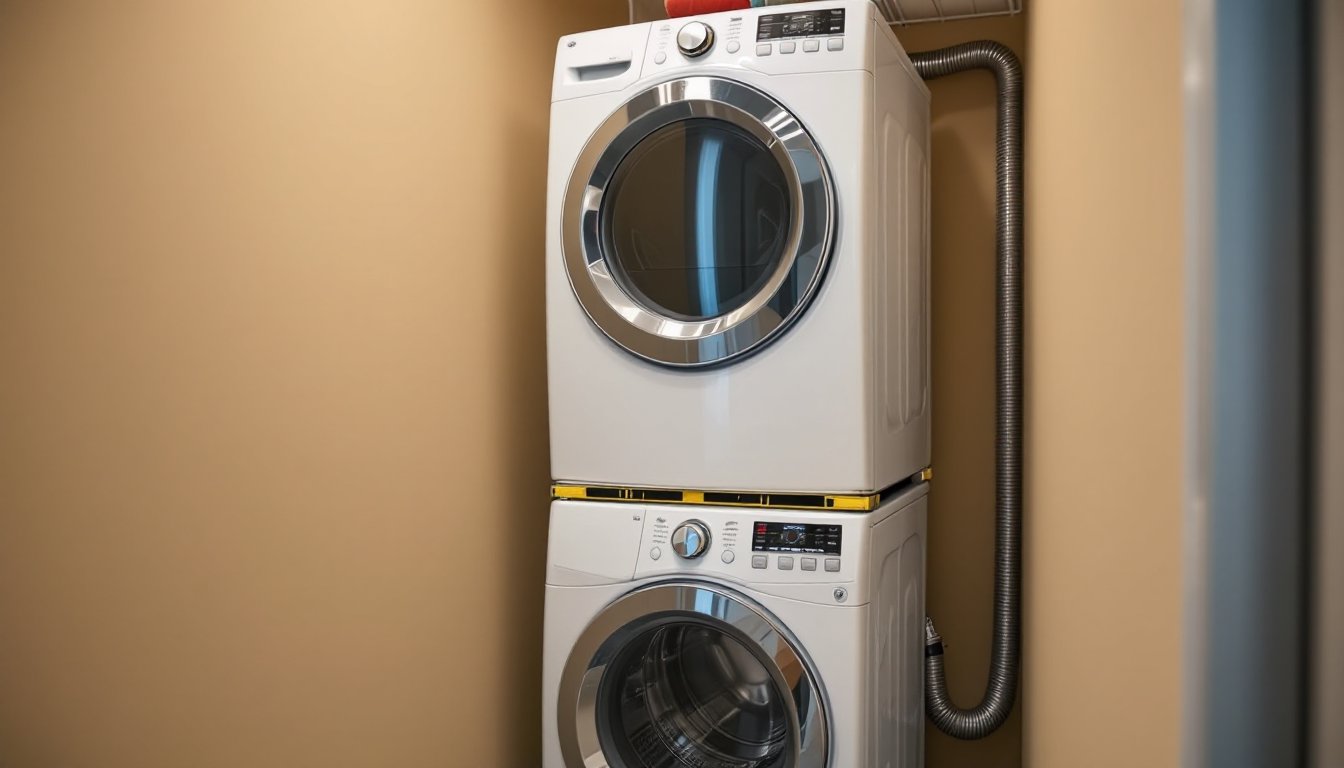
ToggleRunning out of floor space in your laundry room? A washer dryer stacking kit can free up valuable square footage by safely stacking your dryer on top of your front-loading washer. These kits aren’t just about saving space, they also stabilize your machines, reduce vibration, and keep your dryer from walking off the washer during spin cycles. Whether you’re working with a closet laundry setup or a cramped basement, a stacking kit for washer and dryer units offers a practical solution. This guide walks through what stacking kits are, how to choose the right one, and how to install it correctly and safely.
Key Takeaways
- A washer dryer stacking kit reduces laundry room floor space by approximately 50% by safely securing your dryer on top of your front-loading washer.
- Stacking kits stabilize machines, reduce vibration, and prevent dryer movement during spin cycles, protecting your investment and maintaining manufacturer warranty coverage.
- Always verify compatibility with your specific washer and dryer model numbers before purchasing, as dimensions and weight capacities vary significantly by manufacturer.
- Brand-specific stacking kits offer precise fit and guaranteed warranty compliance ($50-$150), while universal kits are more affordable ($30-$80) but require careful measurement and verification.
- Professional installation is recommended for gas dryer connections, as many jurisdictions legally require a licensed technician to ensure safety and code compliance.
- Proper maintenance, including regular bracket inspections every six months and correct vent routing with rigid metal duct, ensures long-term stability and safe operation.
What Is a Washer Dryer Stacking Kit?
A washer and dryer stacking kit is a hardware bracket or frame designed to secure a front-loading dryer on top of a compatible front-loading washer. Most kits consist of two metal or molded plastic brackets that attach to the top corners of the washer and cradle the dryer’s feet or underside. Some models include rubber grips or interlocking tabs to prevent lateral movement during operation.
Stacking kits are engineered to bear the weight of the dryer, typically 100 to 150 pounds when empty, and withstand the dynamic forces of both machines running simultaneously. They’re not universal in fit: dimensions, mounting hole patterns, and weight capacities vary by manufacturer and appliance model. Always verify compatibility with your specific washer and dryer model numbers before purchasing.
These kits differ from aftermarket shelving units or simple platforms. A proper washer & dryer stacking kit locks the dryer in place and distributes its weight evenly across the washer’s top panel, which is designed to handle the load. Using an unapproved method, like stacking machines without hardware, can void warranties, damage appliances, and create serious safety hazards.
Benefits of Using a Stacking Kit in Your Laundry Space
The primary advantage is floor space savings. Stacking reduces the footprint by roughly half, turning a side-by-side setup that occupies about 50 inches of width into a single-file configuration that fits in a closet or narrow alcove. This opens up room for storage cabinets, a folding counter, or even a utility sink.
Stability and vibration control are often underestimated benefits. High-efficiency washers and dryers can generate significant vibration, especially during the spin cycle. Washer dryer stacking kits anchor the dryer to the washer, preventing it from shifting or toppling. Rubber isolators or grommets built into many kits dampen vibration transfer, which reduces noise and wear on both machines.
Stacking also improves ergonomics for the dryer controls and door. Raising the dryer to waist or chest height makes it easier to load and unload without bending over. For homeowners with mobility concerns, this can be a meaningful improvement. But, the washer door remains at floor level, so you’ll still be bending for that part of the process.
Finally, a properly installed washer and dryer stack kit can protect your investment. Many manufacturers require the use of an approved stacking kit to maintain warranty coverage when machines are stacked. Skipping the kit can void both appliance warranties if damage occurs.
How to Choose the Right Stacking Kit for Your Washer and Dryer
Start by checking your appliance documentation or the manufacturer’s website for approved stacking kits. Most major brands publish compatibility charts listing which kits work with which model series. You’ll need the full model numbers of both your washer and dryer, typically found on a label inside the door or along the top edge of the front panel.
Weight capacity is non-negotiable. Verify that the kit is rated for your dryer’s weight, including the maximum load of wet laundry it can hold. Standard kits support up to 150 pounds, but larger-capacity dryers may require reinforced brackets.
Measure the width and depth of both machines. Front-loading washers and dryers are usually 27 inches wide, but compact European-style models can be as narrow as 24 inches. The stacking kit must match the width of your appliances. Depth matters too, deeper machines need longer support arms to prevent the dryer from overhanging the washer’s back edge, which can cause tipping.
Universal vs. Brand-Specific Stacking Kits
Brand-specific kits are engineered for particular model families and include all necessary hardware, precise fit, and guaranteed warranty compliance. They’re the safest choice if your washer and dryer are from the same manufacturer. Expect to pay $50 to $150, depending on the brand and features.
Universal washer dryer stack kits are designed to fit multiple brands and models. They typically use adjustable brackets, generic mounting holes, and wider tolerances. These can be a cost-effective option, often $30 to $80, but require careful measurement and may not offer the same vibration dampening or weight capacity as OEM kits. Some universal kits work well, but others can feel flimsy or require improvised mounting.
If your washer and dryer are from different manufacturers, a universal kit may be your only option. In that case, prioritize kits with steel construction, rubber feet or grips, and customer reviews confirming compatibility with your specific models. When in doubt, consult with a local appliance retailer or check whether professional installation by services listed on Angi might be worth the peace of mind.
Step-by-Step Installation Guide for Your Stacking Kit
Before starting, gather your tools: a Phillips or flathead screwdriver (depending on your kit), a socket wrench or adjustable wrench, a level, and a helper. Stacking a dryer is a two-person job. The dryer alone weighs 100+ pounds, and you’ll need to lift it carefully to avoid injury or scratching the washer.
Step 1: Unplug both machines and turn off the water supply to the washer. If the dryer is gas-powered, shut off the gas valve. Pull both machines away from the wall to create workspace.
Step 2: Clean the top of the washer. Remove any detergent residue or debris. The stacking brackets need a flat, clean surface for secure mounting.
Step 3: Attach the stacking brackets to the washer. Most kits use two L-shaped or U-shaped brackets that bolt or clip onto the washer’s top panel. Align the brackets with the pre-drilled holes or mounting points specified in the kit instructions. Tighten fasteners snugly but don’t overtighten, you can crack plastic panels or strip threads.
Step 4: Position the dryer. With your helper, carefully lift the dryer and set it onto the brackets. Some kits have interlocking tabs or grooves that guide the dryer’s feet into place: others use rubber cups or clamps. Lower the dryer slowly and ensure all four feet or contact points are seated securely.
Step 5: Check level and stability. Place a carpenter’s level on top of the dryer, front-to-back and side-to-side. Adjust the dryer’s leveling feet if needed. The stack should be plumb and stable with no rocking. Give the dryer a gentle shake, if it shifts, recheck bracket alignment and fasteners.
Step 6: Reconnect utilities. Reattach the dryer vent hose (make sure it’s not kinked), plug in the dryer, and restore gas or electrical connections. Reconnect the washer’s water hoses and power. Push the stack back into position, leaving at least 4 inches of clearance behind the dryer for airflow and vent routing.
Step 7: Test both machines. Run a short wash and dry cycle to confirm everything operates normally. Listen for unusual vibration or noise and watch for any movement. If stacking a washer and dryer seems daunting or if you’re working with gas hookups, many homeowners hire a professional installer through Bob Vila or similar trusted platforms to ensure safety and code compliance.
Safety Tips and Common Mistakes to Avoid
Always use a kit designed for your appliances. Improvising with wood blocks, shelving brackets, or generic hardware is dangerous. The washer’s top panel isn’t designed to support unbalanced loads, and vibration can cause a makeshift stack to collapse.
Don’t skip the helper. Lifting and positioning a dryer alone risks back injury, pinched fingers, or dropping the machine. Have someone steady the dryer while you align and secure it.
Avoid overloading the dryer. Just because it’s stacked doesn’t mean you should max out capacity. Overloading increases vibration and stress on the brackets. Follow the manufacturer’s load recommendations.
Inspect brackets and fasteners regularly. Every six months, check that bolts and clips remain tight. Vibration can loosen hardware over time. If you notice increased noise or movement, stop using the machines and re-secure the stack.
Ensure proper venting. A stacked dryer may require a different vent routing path. Use smooth, rigid metal duct, not flexible plastic or foil, and keep the run as short and straight as possible. Check local building codes: some jurisdictions require specific vent materials or terminations for stacked appliances.
Consider floor strength. If you’re stacking in an upper-floor laundry room, verify that the floor structure can handle the combined weight of both machines, water, and laundry. A fully loaded washer can weigh over 300 pounds, and a stacked pair adds concentrated point loads. For older homes or questionable floor framing, consult a structural engineer or contractor.
Wear safety gear. Use work gloves to protect your hands from sharp edges, and steel-toe boots if you have them. If drilling or cutting is required, use safety glasses.
Finally, if your dryer is gas-powered, recognize that moving and reconnecting the gas line is a job best left to a licensed plumber or HVAC technician. In many areas, it’s a code requirement. A faulty gas connection can lead to leaks, fire, or carbon monoxide hazards. Some stackable washer and dryer sets come with specific stacking hardware included, which simplifies installation and ensures compatibility.
Conclusion
A washer dryer stacking kit is a straightforward, effective way to reclaim floor space without sacrificing laundry capacity. By choosing the right kit, following installation steps carefully, and prioritizing safety, most DIYers can complete the project in under an hour. Keep brackets tight, verify compatibility with your models, and don’t hesitate to call in a pro for gas connections or structural concerns. Done right, a stacked laundry setup delivers years of stable, quiet operation in half the footprint.